Are you tired of dealing with a malfunctioning iPhone? Don’t worry, we’ve got you covered! In this comprehensive guide, we will walk you through the step-by-step process of repairing your iPhone, empowering you to become a tech guru in no time. But we won’t stop there – we’ll also brush up on repair techniques for iPads and Samsung Galaxy phones, ensuring that you’re equipped with the knowledge to fix a range of devices. Say goodbye to costly repairs and hello to taking matters into your own capable hands.
But where do you start on your quest to become a repair expert? Enter "SellUp," the ultimate platform that simplifies the process of finding dependable, certified repair vendors right here in Singapore. With SellUp, you can skip the hassle of scouring the internet for reliable repair services. Instead, you’ll have access to a curated list of trusted professionals who can get your device back up and running in no time.
So, tighten your seatbelt and get ready to dive into the world of iPhone repairs. Whether you just need to replace a cracked screen or fix a stubborn software issue, this guide will equip you with the know-how to conquer any iPhone repair challenge that comes your way. Let’s unleash your inner tech guru and bring your iPhone back to life!
Repair Phone
Section 1: Repairing Your iPhone
In this section, we will guide you on how to repair your iPhone. Whether you’re dealing with a cracked screen, a battery issue, or any other common problem, we’ve got you covered. So let’s get started!
Cracked Screen: One of the most common issues people face with their iPhones is a cracked screen. If you find yourself in this situation, don’t worry, it’s fixable! The first step is to assess the damage. If the cracks are minor, you can consider using a screen protector to prevent further damage. However, if the screen is severely cracked, it’s best to take it to a professional repair service.
Battery Replacement: Is your iPhone battery draining too quickly or not holding a charge? It might be time for a battery replacement. You can either take it to an authorized Apple service center or use a certified repair vendor from the "SellUp" platform. They will ensure that your iPhone receives a high-quality battery replacement, giving it a new lease on life.
Software Issues: Sometimes, your iPhone may encounter software-related problems, such as freezing or apps crashing. Before pursuing any repairs, try restarting your device or updating to the latest software version. If the issue persists, you can explore troubleshooting steps provided by Apple’s support team or reach out to a certified repair vendor for assistance.

Remember, repairing your iPhone can save you both time and money compared to purchasing a new one. So, don’t hesitate to explore your options and unleash your inner tech guru with our comprehensive guide! Stay tuned for the next sections, where we’ll discuss repairing iPads and Samsung Galaxy Phones.
Section 2: Repairing Your iPad
In this section, we will focus on repairing your iPad. Whether you’re dealing with a cracked screen, unresponsive buttons, or any other technical issues, don’t worry! With a little guidance, you can become a tech guru and fix your iPad on your own.
When it comes to repairing your iPad, it’s essential to have the right tools before you begin. Start by purchasing a repair kit that includes a set of screwdrivers, pry tools, and a suction cup. These tools will help you disassemble your iPad and access the internal components safely.
Before you start the repair process, make sure to find a well-lit and clean workspace. Removing any distractions will help you stay focused and prevent any accidental damage to your iPad.
Once you have your tools and workspace ready, it’s time to dive into the repair process. Begin by following step-by-step tutorials or guides available online that cater specifically to your iPad model. These resources will walk you through the entire repair process, ensuring that you don’t miss any crucial steps.
Remember, repairing your iPad on your own requires patience and attention to detail. Take your time to disassemble and reassemble the device carefully, ensuring that all components are properly aligned and connected.
By following these guidelines, you can successfully repair your iPad and unleash your inner tech guru. Remember, practice makes perfect, so don’t be discouraged if it takes a few tries to get everything right.
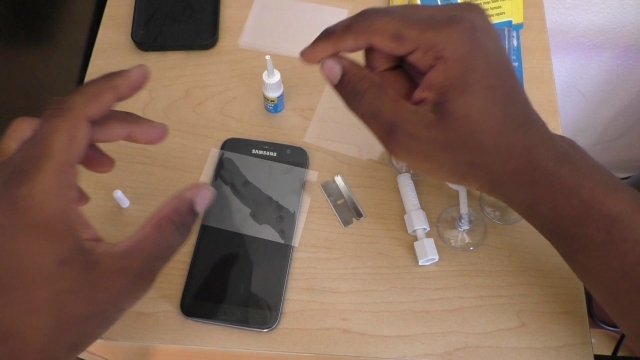
Section 3: Repairing Your Samsung Galaxy Phone
Whether you’ve encountered a cracked screen, a non-responsive touchpad, or any other issue with your Samsung Galaxy phone, knowing how to repair it can save you time and money. In this section, we will provide you with some useful tips on how to fix common problems that may arise with your device.
Step 1: Diagnose the Problem
Before you start dismantling your Samsung Galaxy phone, it’s essential to identify the root cause of the issue. Is the screen not displaying anything, or is it malfunctioning? Is the battery draining quickly, or is the device not turning on at all? By understanding the problem, you can determine the appropriate solution and necessary replacement parts.
Step 2: Gather the Required Tools
To successfully repair your Samsung Galaxy phone, you will need the right tools. A small Phillips screwdriver, a plastic spudger or opening tool, and a suction cup are commonly used. Additionally, you might need replacement parts such as a new screen, battery, or charging port. These components can usually be purchased online or from reputable repair shops.
Step 3: Follow a Repair Guide or Tutorial
Repairing your Samsung Galaxy phone requires careful attention to detail. Luckily, there are plenty of online resources available that provide step-by-step instructions, including video tutorials. Utilize these guides and tutorials to ensure you are following the correct procedures for your specific model. Remember to take your time and proceed with caution throughout the repair process.
By following these steps, you can take matters into your own hands and potentially save some money by repairing your Samsung Galaxy phone yourself. However, if you’re uncomfortable with DIY repairs or prefer professional assistance, platforms like "SellUp" simplify the process of finding certified repair vendors in Singapore.